Vue.js: directive (2)
v-pre
v-pre 디렉티브를 선언하면 해당 태그는 컴파일되지 않고 그대로 출력됩니다.
index.html
<!DOCTYPE html>
<html lang="ko">
<head>
  <script src="https://cdn.jsdelivr.net/npm/vue@2/dist/vue.js"></script>
  <script defer src="./main.js"></script>
  <title>Vue 연습</title>
</head>
<body>
  <div id="app" v-pre>{{ message }}</div>
</body>
</html>
main.js
const mv = new Vue({
  data: {
    message: 'hello, world!'
  }
}).$mount('#app')
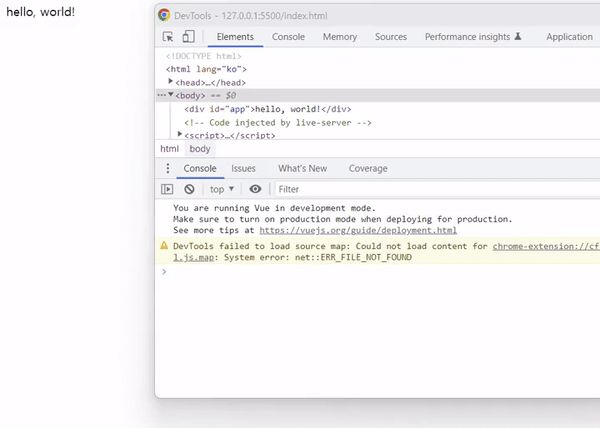
출력 결과

v-pre 디렉티브가 없다면 텍스트 보간에 의하여 hello, world!가 출력되어야 하지만, 출력 결과를 확인하면 컴파일 되지않고 {{ message }}가 텍스트 그대로 출력됩니다.
v-once
v-once 디렉티브는 일회성 디렉티브 입니다.
index.html
<!DOCTYPE html>
<html lang="ko">
<head>
  <script src="https://cdn.jsdelivr.net/npm/vue@2/dist/vue.js"></script>
  <script defer src="./main.js"></script>
  <title>Vue 연습</title>
</head>
<body>
  <div id="app" v-once>{{ message }}</div>
</body>
</html>
main.js
const mv = new Vue({
  data: {
    message: 'hello, world!'
  }
}).$mount('#app')
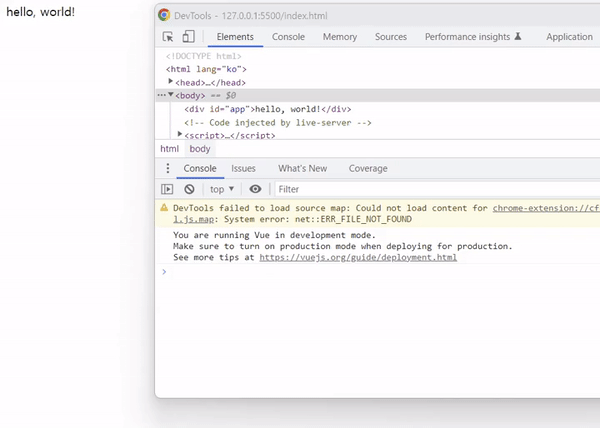
출력 결과를 확인하면 아래와 같이 텍스트 보간에 의하여 hello, world!라는 텍스트가 출력됩니다.
출력 결과

message를 변경하면 바인딩된 텍스트 메시지도 변경되어야 하지만, v-once 디렉티브의 경우 처음 컴파일된 메시지 상태가 그대로 남습니다.
출력 결과
v-cloak
v-cloak 디렉티브는 컴파일 되기전 Mustache 태그를 감추기 위해 사용됩니다.
아래와 같이 setTimeout 메소드를 통해 3초후 vue 객체를 생성하고 텍스트 보간을 하겠습니다.
index.html
<!DOCTYPE html>
<html lang="ko">
<head>
  <script src="https://cdn.jsdelivr.net/npm/vue@2/dist/vue.js"></script>
  <script defer src="./main.js"></script>
  <title>Vue 연습</title>
</head>
<body>
  <div id="app">{{ message }}</div>
</body>
</html>
main.js
setTimeout(() => {
  new Vue({
    data: {
      message: 'hello, world!'
    }
  }).$mount('#app')
}, 3000)
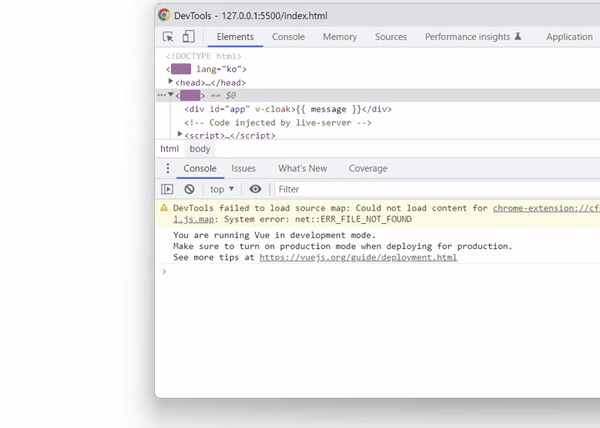
아래와 같이 출력 결과를 확인하면 vue 객체가 생성되어 컴파일 되기 전까지 Mustache 태그가 그대로 표시됩니다.
출력 결과
v-cloak 디렉티브는 vue 객체가 컴파일 된 이후 자동으로 제거되기 때문에 v-cloak 속성을 선택자로 하여 display: none; 스타일 속성을 추가하면 됩니다.
index.html
<!DOCTYPE html>
<html lang="ko">
<head>
  <script src="https://cdn.jsdelivr.net/npm/vue@2/dist/vue.js"></script>
  <script defer src="./main.js"></script>
  <style>
    [v-cloak] { display: none; }
  </style>
  <title>Vue 연습</title>
</head>
<body>
  <div id="app" v-cloak>{{ message }}</div>
</body>
</html>
출력 결과
v-show
v-show 디렉티브는 v-if 디렉티브와 유사하게 조건문에 대하여 DOM 렌더링 여부를 결정합니다.
하지만 태그 자체를 생성하거나 제거하는 v-if와 달리 v-show는 display 스타일 속성을 통해 렌더링을 결정합니다.
index.html
<!DOCTYPE html>
<html lang="ko">
<head>
  <script src="https://cdn.jsdelivr.net/npm/vue@2/dist/vue.js"></script>
  <script defer src="./main.js"></script>
  <title>Vue 연습</title>
</head>
<body>
  <div id="app">
    <span v-show="isNotice">{{ notice }}</span>
  </div>
</body>
</html>
main.js
const mv = new Vue({
  data: {
    notice: 'notice',
    isNotice: true
  }
}).$mount('#app')
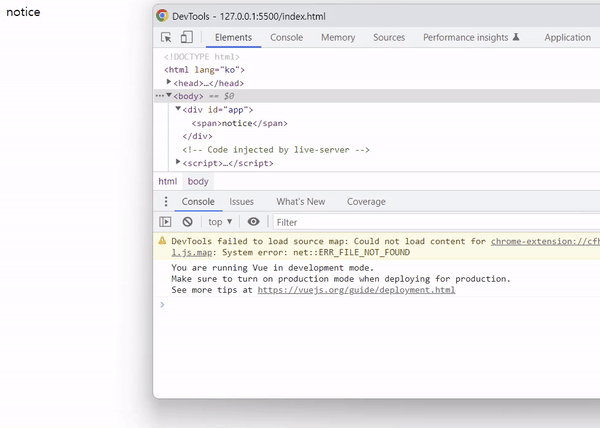
isNotice를 false로 변경하면 태그 자체가 사라지는 것이 아니라 display: none; 스타일 속성이 추가되는 것을 확인할 수 있습니다.
출력 결과
태그 자체를 추가하거나 제거하는 것이 아니기 때문에 조건이 자주 변경된다면 v-if 디렉티브보다 v-show 디렉티브를 사용하는 것이 효율적입니다.
v-on
v-on 디렉티브는 이벤트를 연결합니다. 아직 컴포넌트에 대해서 설명하지 않았지만 하위 컴포넌트에서 상위 컴포넌트로의 데이터 전달은 이벤트를 통해 가능합니다.
이벤트는 v-on:[이벤트 이름]="메소드명" 형태로 연결합니다. 클릭이벤트를 연결해보겠습니다.
index.html
<!DOCTYPE html>
<html lang="ko">
<head>
  <script src="https://cdn.jsdelivr.net/npm/vue@2/dist/vue.js"></script>
  <script defer src="./main.js"></script>
  <title>Vue 연습</title>
</head>
<body>
  <div id="app">
    <div>{{ num }}</div>
    <button v-on:click="increase">증가</button>
    <button v-on:click="decrease">감소</button>
  </div>
</body>
</html>
main.js
const mv = new Vue({
  data: {
    num: 0
  },
  methods: {
    increase() {
      this.num++
    },
    decrease() {
      this.num--
    }
  }
}).$mount('#app')
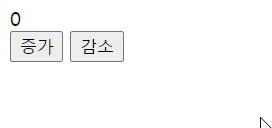
각각의 버튼에 대한 클릭 이벤트에 num 데이터를 1 증가시키는 메소드와 1 감소시키는 메소드를 연결했습니다.
출력 결과
v-on 디렉티브는 v-bind 디렉티브를 : 기호를 통해 선언하는 것처럼 @ 기호를 통해 선언할 수도 있습니다.
index.html
<!DOCTYPE html>
<html lang="ko">
<head>
  <script src="https://cdn.jsdelivr.net/npm/vue@2/dist/vue.js"></script>
  <script defer src="./main.js"></script>
  <title>Vue 연습</title>
</head>
<body>
  <div id="app">
    <div>{{ num }}</div>
    <button @click="increase">증가</button>
    <button @click="decrease">감소</button>
  </div>
</body>
</html>